VMWare固定虚拟机Ip
因为我不想出钱买服务器,毕竟要充100才能按量扣费。。。刚好自己电脑内存是32G的,所以打算自己开虚拟机。
这里固定ip是我学习的中途才开始做的,真的踩了很大的坑,没有固定Ip,电脑重启后Ip直接变了,原本我有台虚拟机的Ip是105结尾,我自己笔记本重启后,Ip居然也变成了105结尾。。。当时服务器都连不上了,排查了半天,才发现是宿主机和虚拟机ip重复了。
VMWare -> 编辑 -> 虚拟网络编辑器。
先点右下角的管理员授权,然后选中VMnet8,点击NAT设置:
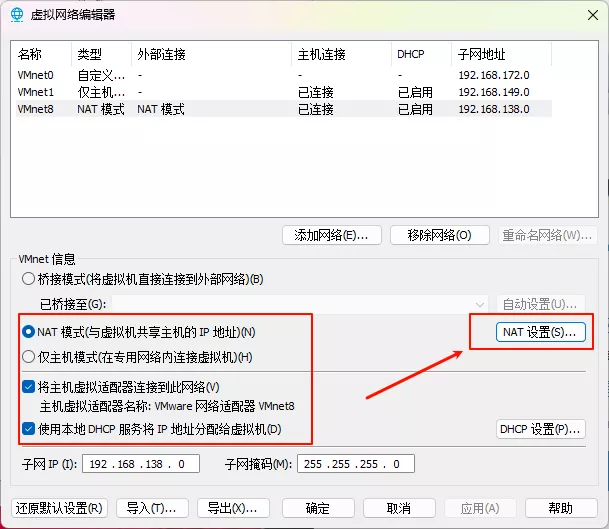
记住里面的网关IP,其实就是外面的子网IP,但是最后一个IP位的值必须是2。
比如我这里的子网IP是192.168.138.0,那网关的值就只能是192.168.138.2。
之后把虚拟机关机,在设置里面选择网络适配器 -> 自定义 -> 选择上面的VMnet8,保存后开机。
开机后,编辑/etc/sysconfig/network-scripts/ifcfg-ens33文件
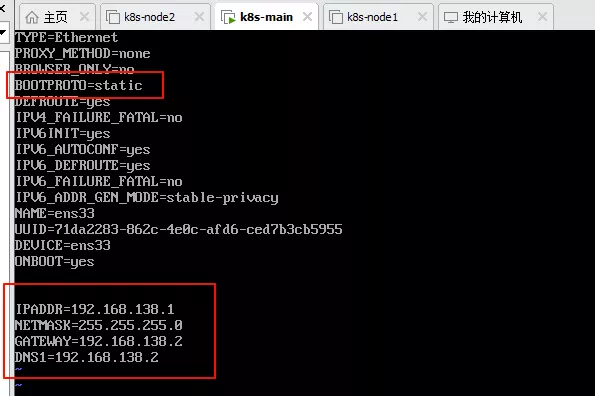
记得把上面的BOOTPROTO从dhcp改为static。
然后最下面四行,除了第一行可以自己写以外,别的是对应刚才的网络适配器里面的配置。
具体配置是什么意思就不多说了,都来学k8s了,计网一定还是稍微懂一点的吧。。
这里我的ip最后一位用的是 1,推荐还是换成 2 以后的值,毕竟网关用的是 2,从网关后面开始比较好。
后面用kubeadm初始化主节点的时候可能会提示你ip转发功能关闭了,这里需要添加额外配置。
编辑/etc/sysctl.conf 文件,在最后一行添加:
net.ipv4.ip_forward = 1conf
应用配置:sysctl -p,之后重启网络service network restart。
查看转发功能是否开启:sysctl net.ipv4.ip_forward,如果为1则为开启。
基础架构图

- API server: 秘书部
- Cloud controller Manager:外联部
- Controller manager:决策者
- etcd:资料库(高可用、高一致性数据库)
- kubelet:厂长
- kube-proxy:门卫
- Scheduler:调度者(应用去哪个节点部署)
- Control plane:k8s主节点
- Node:k8s节点
搭建K8s集群
环境配置
#各个机器设置自己的域名
hostnamectl set-hostname xxxx


# 将 SELinux 设置为 permissive 模式(相当于将其禁用)
sudo setenforce 0
sudo sed -i 's/^SELINUX=enforcing$/SELINUX=permissive/' /etc/selinux/config

#关闭swap
swapoff -a
sed -ri 's/.*swap.*/#&/' /etc/fstab

#允许 iptables 检查桥接流量
cat <<EOF | sudo tee /etc/modules-load.d/k8s.conf
br_netfilter
EOF

cat <<EOF | sudo tee /etc/sysctl.d/k8s.conf
net.bridge.bridge-nf-call-ip6tables = 1
net.bridge.bridge-nf-call-iptables = 1
EOF
sudo sysctl --system
bash
安装三大组件
查看最新版本:https://dl.k8s.io/release/stable.txt
cat << EOF > /etc/yum.repos.d/kubernetes.repo
[kubernetes]
name=Kubernetes
baseurl=https://mirrors.aliyun.com/kubernetes/yum/repos/kubernetes-el7-x86_64/
enabled=1
gpgcheck=1
repo_gpgcheck=1
gpgkey=https://mirrors.aliyun.com/kubernetes/yum/doc/yum-key.gpg https://mirrors.aliyun.com/kubernetes/yum/doc/rpm-package-key.gpg
EOF


sudo yum install -y kubelet kubeadm kubectl --disableexcludes=kubernetes

sudo systemctl enable --now kubelet
bash
提示找不到软件包的话可用清理一下缓存:
yum clean all yum makecachebash
初始化主节点
需要把版本号替换为对应的。
kubeadm init \ --apiserver-advertise-address=192.168.1.105 \ --control-plane-endpoint=cluster-endpoint \ --kubernetes-version v1.28.2 \ --image-repository registry.aliyuncs.com/google_containers \ --service-cidr=10.96.0.0/16 \ --pod-network-cidr=10.97.0.0/16bash
- apiserver-advertise-address:主节点ip
- image-repository: 设置镜像仓库
- service-cidr:service网段
- pod-network-cidr:pod网段
CRI v1 runtime API is not implemented
启动后可能会报错:
[ERROR CRI]: container runtime is not running: output: time="2024-02-08T20:28:24+08:00" level=fatal msg="validate service connection: CRI v1 runtime API is not implemented for endpoint \"unix:///var/run/containerd/containerd.sock\": rpc error: code = Unimplemented desc = unknown service runtime.v1.RuntimeService" , error: exit status 1shell
解决方法:vi /etc/containerd/config.toml。
注释掉其中的:disabled_plugins = ["cri"]
重启:systemctl restart containerd,然后重新进行初始化。
如果第二次初始化可能会报端口占用,这时候直接重置就行:kubeadm reset。
timed out waiting for the condition
虽然这个问题最后是我自己很傻逼的打掉了一个字造成的,但还是在这里分享一下我是怎么发现的。
[kubelet-check] Initial timeout of 40s passed. Unfortunately, an error has occurred: timed out waiting for the condition This error is likely caused by: - The kubelet is not running - The kubelet is unhealthy due to a misconfiguration of the node in some way (required cgroups disabled) If you are on a systemd-powered system, you can try to troubleshoot the error with the following commands: - 'systemctl status kubelet' - 'journalctl -xeu kubelet'shell
报错时它有两部分提示,其中第一部分提示你检查kubelet是否启动。这个我们很快就能排查。
然后下面一部分提示,由于我一开始没有搞清楚systemd-powered system是什么意思,所以我就没看,就跑去网上搜了。
然后发现大部分解决方法都不行。。。然后就试了一下,结果发现真能用,看到日志了:
2月 08 21:37:34 k8s-main kubelet[11196]: I0208 21:37:34.072195 11196 kubelet_node_status.go:70] "Attempting to register node" node="k8s-main" 2月 08 21:37:34 k8s-main kubelet[11196]: E0208 21:37:34.082146 11196 kubelet_node_status.go:92] "Unable to register node with API server" err="Post \"https://cluster-endpoint:6443/api/v1/nodes\": dial tcp: lookup2月 08 21:37:34 k8s-main kubelet[11196]: E0208 21:37:34.498994 11196 certificate_manager.go:562] kubernetes.io/kube-apiserver-client-kubelet: Failed while requesting a signed certificate from the control plane:shell
可用发现,访问cluster-endpoint:6443失败了,ping了一下,发现还真不通,然后我又去跑去看了一眼我的hosts。
结果发现我踏马endpoint打掉了最后面那个t。。。
改完host,发现还是启动不了。
继续看了下日志,发现是镜像没拉下来:
2月 08 22:17:14 k8s-main kubelet[12197]: E0208 22:17:14.105521 12197 remote_runtime.go:193] "RunPodSandbox from runtime service failed" err="rpc error: code = DeadlineExceeded desc = failed to get sandbox image \"registry.k8s.io/pause:3.6\": failed to pull image \"registry.k8s.io/pause:3.6\": failed to pull and unpack image \"registry.k8s.io/pause:3.6\": failed to resolve reference \"registry.k8s.io/pause:3.6\": failed to do request: Head \"https://registry.k8s.io/v2/pause/manifests/3.6\": dial tcp 34.96.108.209:443: i/o timeout"log
然后我在网上翻了半天,找到了这个人的博客:failed to get sandbox image “k8s.gcr.io/pause:3.6“: failed to pull image “k8s.gcr.io/pause:3.6“。
我看了下本地的文件,也没有sandbox_image 这一行啊?。。
然后我直接把他的代码粘进去了,重启,发现鸟用没有。
然后我灵机一动,改成搜索如何修改sandbox镜像,果然就找到了:containerd拉取私库镜像失败(kubelet)
原来是先要初始化一下配置文件:
containerd config default > /etc/containerd/config.tomlbash
然后再去修改、重启就有效了。
根据提示继续
初始化成功后会提示下面的内容:
Your Kubernetes control-plane has initialized successfully! To start using your cluster, you need to run the following as a regular user: mkdir -p $HOME/.kube sudo cp -i /etc/kubernetes/admin.conf $HOME/.kube/config sudo chown $(id -u):$(id -g) $HOME/.kube/config Alternatively, if you are the root user, you can run: export KUBECONFIG=/etc/kubernetes/admin.conf You should now deploy a pod network to the cluster. Run "kubectl apply -f [podnetwork].yaml" with one of the options listed at: https://kubernetes.io/docs/concepts/cluster-administration/addons/ You can now join any number of control-plane nodes by copying certificate authorities and service account keys on each node and then running the following as root: kubeadm join cluster-endpoint:6443 --token wdvggh.980xtzhyrr2g0iti \ --discovery-token-ca-cert-hash sha256:04e247aff627e00fdee90715ab2df601641e5494cae46d6c03854a28ad2d36e4 \ --control-plane Then you can join any number of worker nodes by running the following on each as root: kubeadm join cluster-endpoint:6443 --token wdvggh.980xtzhyrr2g0iti \ --discovery-token-ca-cert-hash sha256:04e247aff627e00fdee90715ab2df601641e5494cae46d6c03854a28ad2d36e4shell
按照它的提示一步一步走就行。
安装网络组件
网络组件有很多种,在下面的官网可以看到:
这里以calico为例:Install Calico networking and network policy for on-premises deployments。
kubectl create -f https://raw.githubusercontent.com/projectcalico/calico/v3.27.0/manifests/tigera-operator.yaml

# 注意这个文件里面会配置网段,如果之前kubeadm init的时候没有修改pod-network-cidr,则可用直接appy
# 否则需要手动修改里面的ip网段。
kubectl create -f https://raw.githubusercontent.com/projectcalico/calico/v3.27.0/manifests/custom-resources.yaml

# 执行这个命令,直到所有pod全部为Running
watch kubectl get pods -n calico-system

# 最后清除多余的东西
kubectl taint nodes --all node-role.kubernetes.io/control-plane-
kubectl taint nodes --all node-role.kubernetes.io/master-
bash
最后执行kubectl get nodes -o wide:
NAME STATUS ROLES AGE VERSION INTERNAL-IP EXTERNAL-IP OS-IMAGE KERNEL-VERSION CONTAINER-RUNTIME <your-hostname> Ready master 52m v1.12.2 10.128.0.28 <none> Ubuntu 18.04.1 LTS 4.15.0-1023-gcp docker://18.6.1shell
发现是Ready,就表示成功了。
最后看一下节点:
[root@k8s-main ~]# kubectl get pods -A NAMESPACE NAME READY STATUS RESTARTS AGE calico-apiserver calico-apiserver-58d85b5c6-bsg9n 0/1 Running 0 24s calico-apiserver calico-apiserver-58d85b5c6-gtpqg 0/1 Running 0 24s calico-system calico-kube-controllers-6d957bb4d9-jrppk 1/1 Running 0 13m calico-system calico-node-76987 1/1 Running 0 13m calico-system calico-typha-76dd56c6f7-tmtxs 1/1 Running 0 13m calico-system csi-node-driver-6jmkd 2/2 Running 0 13m kube-system coredns-66f779496c-bpqbx 1/1 Running 0 14m kube-system coredns-66f779496c-kpj5t 1/1 Running 0 14m kube-system etcd-k8s-main 1/1 Running 3 14m kube-system kube-apiserver-k8s-main 1/1 Running 3 14m kube-system kube-controller-manager-k8s-main 1/1 Running 3 14m kube-system kube-proxy-cgclx 1/1 Running 0 14m kube-system kube-scheduler-k8s-main 1/1 Running 3 14m tigera-operator tigera-operator-55585899bf-j2pvw 1/1 Running 0 13mshell
节点加入集群
在主节点初始化完后,会弹出一个直接加入的命令,直接用那个加入命令就行了。
如果忘记了,可以创建一个新令牌:
kubeadm token create --print-join-commandbash
使用kubeadm token list可以打印所有token。
部署Dashboard
部署
直接打开release界面,选择最新版本,运行最下面的脚本:
kubectl apply -f https://raw.githubusercontent.com/kubernetes/dashboard/v2.7.0/aio/deploy/recommended.yamlbash
部署后可能会跑不起来,使用下面的命令查看日志:
# 如果容器还没创建
kubectl describe pod kubernetes-dashboard-78f87ddfc-wlc7c -n kubernetes-dashboard

# 如果容器已经创建,但是崩溃了
kubectl logs kubernetes-dashboard-78f87ddfc-wlc7c -n kubernetes-dashboard
bash
通常会报这个错:
panic: Get "https://10.96.0.1:443/api/v1/namespaces/kubernetes-dashboard/secrets/kubernetes-dashboard-csrf": dial tcp 10.96.0.1:443: i/o timeoutlog
这是由于我们的网络模式是ClusterIp,直接进行下一步的访问端口设置就行。
设置访问端口
kubectl edit svc kubernetes-dashboard -n kubernetes-dashboardbash
之后搜索ClusterIP,把值修改为NodePort,保存。
运行下面的指令查看端口:
[root@k8s-main docker]# kubectl get svc -A NAMESPACE NAME TYPE CLUSTER-IP EXTERNAL-IP PORT(S) AGE default kubernetes ClusterIP 10.96.0.1 <none> 443/TCP 23h kube-system kube-dns ClusterIP 10.96.0.10 <none> 53/UDP,53/TCP,9153/TCP 23h kubernetes-dashboard dashboard-metrics-scraper ClusterIP 10.96.211.104 <none> 8000/TCP 32m kubernetes-dashboard kubernetes-dashboard NodePort 10.96.100.180 <none> 443:32081/TCP 32mbash
最后一行有个443:32081,32081就是我们的外网访问地址,直接用节点ip(任意节点,主节点和从节点都可以) + 端口即可访问。
创建访问账号
进入页面后会要求提供令牌,上面的文档也提到了,创建pod时会自动创建默认用户,但是这个默认用户权限不够高,无法使用完整功能,所以需要我们手动创建一个新账号:
#创建访问账号,准备一个yaml文件; vi dash.yaml
apiVersion: v1
kind: ServiceAccount
metadata:
  name: admin-user
  namespace: kubernetes-dashboard
---
apiVersion: rbac.authorization.k8s.io/v1
kind: ClusterRoleBinding
metadata:
  name: admin-user
roleRef:
  apiGroup: rbac.authorization.k8s.io
  kind: ClusterRole
  name: cluster-admin
subjects:
- kind: ServiceAccount
  name: admin-user
  namespace: kubernetes-dashboard
yaml
应用账号:
kubectl apply -f dash.yamlbash
获取临时访问令牌:
#获取访问令牌
kubectl create token admin-user -n kubernetes-dashboard
bash
获取长期访问令牌
kubectl apply -f - <<EOF
apiVersion: v1
kind: Secret
metadata:
  name: admin-user-secret
  namespace: kubernetes-dashboard
  annotations:
    kubernetes.io/service-account.name: admin-user
type: kubernetes.io/service-account-token
EOF
yaml
查看长期令牌:
kubectl describe secrets/admin-user-secret -n kubernetes-dashboardshell
生命周期钩子
Kubernetes 中为容器提供了两个 hook:
-
PostStart此钩子函数在容器创建后将立刻执行。但是,并不能保证该钩子函数在容器的的ENTRYPOINT之前执行。该钩子函数没有输入参数。 -
PreStop此钩子函数在容器被terminate(终止)之前执行,例如:- 通过接口调用删除容器所在Pod
- 某些管理事件的发生:健康检查失败、资源紧缺等
如果容器已经被关闭或者进入了 completed 状态,
PreStop钩子函数的调用将失败。该函数的执行是同步的,即,kubernetes 将在该函数完成执行之后才删除容器。该钩子函数没有输入参数。
查看帮助:
kubectl explain pod.spec.containers.lifecycle.postStart

KIND:       Pod
VERSION:    v1

FIELD: postStart <LifecycleHandler>

DESCRIPTION:
    PostStart is called immediately after a container is created. If the handler
    fails, the container is terminated and restarted according to its restart
    policy. Other management of the container blocks until the hook completes.
    More info:
    https://kubernetes.io/docs/concepts/containers/container-lifecycle-hooks/#container-hooks
    LifecycleHandler defines a specific action that should be taken in a
    lifecycle hook. One and only one of the fields, except TCPSocket must be
    specified.

FIELDS:
  exec  <ExecAction>
    # 执行命令
    Exec specifies the action to take.

  httpGet       <HTTPGetAction>
    # 发送一个 Get 请求
    HTTPGet specifies the http request to perform.

  tcpSocket     <TCPSocketAction>
    Deprecated. TCPSocket is NOT supported as a LifecycleHandler and kept for
    the backward compatibility. There are no validation of this field and
    lifecycle hooks will fail in runtime when tcp handler is specified.
bash
PreStop可选的属性和PostStart是一样的。
探针
k8s还提供了和生命周期钩子相似的一些属性:
- startupProbe:启动探针(表示容器是否启动)
- livenessProbe:存活探针(表示容器是否存活)
- readinessProbe:就绪探针(表示容器是否能够对外提供服务)
具体的值和生命周期相似。
其它容器
在 Pod spec.containers中可以声明容器之外,还有下列方式可以创建容器:
-
initContainers:初始化容器,在初始化容器运行完毕之后才会运行提供服务的容器
初始化容器如果需要给 container 添加文件,则需要以卷的方式添加。
-
ephemeralcontainers临时容器,用于线上排错,例如容器中只有基础镜像,没有必要的排查工具,线上无法排查问题。使用包含排查工具的临时容器,就可以对 containerd 进行排查,临时容器和 Pod 共享了大部分资源。